Quote

"Scrapbooking Is Your Own Personal Holiday"~~Sara~~


Showing posts with label Christmas. Show all posts

Sunday, December 1, 2013

Jolly Fun Layout


Jolly Fun Layout

Supplies:

Silhouette Cameo
Jolly Fun word phrase by Samantha Walker Design ID #13454
Flourish Poinsettia corner by Snapdragon Snippets  Design ID #36528
The printed Santa is a Santa by Lettering Delights Design ID #23146
The poinsettia was made from a Stampin Up flower punch

Christmas Layout


December Journal


Saturday, November 30, 2013

Look Who Showed Up At My House!!!!


This sneaky little girl showed up at my house today.
It's an girl Elf On The Shelf!!  I'm going to do this with my Granddaughter this year.
It should be lots of fun. Now for a name.....hmmmmm
I'm not good at giving names. Anyone have any ideas on what to name her?


~Mary

Sunday, December 2, 2012

Rudolph Christmas Card


 Rudolph Christmas Card

Card Size: 5-1/2 x 8-1/2

Supplies:

Cricut Craft Room Basics - Background Shape
I placed 2 images on my mat and sized it to layer one on top of the other.
Create a Critter 2 cartridge - Reindeer
Martha Stewart Holiday Cakes Cricut Cartridge - Merry Christmas
October Afternoon - Distressed Snowflake and Bells paper
The pattern paper is distressed from the manufacturer as you can see on the right side of the card.

Christmas Tree Card


Christmas Tree Card

Card Size: 5-1/2 x 8-1/2

Supplies:
Cricut Craft Room Basics - Background Shape
I placed 2 images on my mat and sized it to layer one on top of the other. 
Cricut Create a Critter 2 Cartridge - Tree Cut
Cricut Martha Stewart Holiday Cakes Cartridge - Merry Christmas
October Afternoon - Pattern Papers

Reindeer Christmas Card


Reindeer Christmas Card

Card Size: 5-1/2 x 8-1/2

Supplies:
 
Cricut Craft Room Basics - Background Shape
I placed 2 images on my mat and sized it to layer one on top of the other.
Create a Critter 2 cartridge - Reindeer
Martha Stewart Holiday Cakes Cricut Cartridge - Merry Christmas
October Afternoon - Distressed Polka Dot and Ornament paper
The pattern paper is distressed from the manufacturer as you can see on the right side of the card.


Christmas Tree Card


Christmas Tree Card

Card Size: 5-1/2 x 8-1/2

Supplies:

Cricut Craft Room Basics - Background Shape
I placed 2 images on my mat and sized it to layer one on top of the other. 
Cricut Create a Critter 2 Cartridge - Tree Cut
Cricut Martha Stewart Holiday Cakes Cartridge - Merry Christmas
October Afternoon - Pattern Papers
The pattern paper is distressed from the manufacturer as you can see on the right side of the card.

Saturday, November 10, 2012

Snow Folks Winter Snow Girls


I'm working on Christmas Cards.
I just got the Cricut Snowfolks Cartridge.


Snow Folks Winter Snow Girls

Card Size: 5-1/2 x 8-1/2

Supplies:
Cricut Snow Folks Cartridge - Snow girls cute at 3.5 true size
Cricut Imagine - Snow Angel Cartridge to flood fill the coats and mittens.
Cricut Martha Stewart Holiday Cakes Cartridge - Merry Christmas cut at W - 5.097 x H - 2.069 in Cricut Craft Room Design Software
For the snow I used the paper tearing technique. Then I chalked the edges.


Thursday, December 29, 2011

Floating Christmas Ornament


Floating Christmas Ornament

Supplies:

Imagine Santa's Village - Santa  cut at 1.139 W x 0.917H
Imagine Santa's Village - Deer cut at 0.694 W x 1.25 H
Trees from Camp out cartridge cut at 1.514 W x 1.375 H
Trees from Christmas Cartridge cut at 1.819 W x 1.361 H
This is a 3" clear plastic ornament. It comes in 2 sections for putting things inside.
I hot glued the pieces in the globe. I used Martha Stewart snow in the ornament.

Monday, December 12, 2011

Pine Cone Topiary


First I gathered up some pine cones around our yard.


Next I bought 6- 4" clay pots


I painted the with Turquoise Apple Barrel Acrylic Paint
that I picked up from Walmart


With The Imagine Snow Angel Cartridge I printed out 2 sizes of snowflakes.
1-1/2" and 2" snowflakes. You can find these snowflakes on page 18 of the handbook.
They did not cut out. I guess it is another gliche with the update.
So I had to hand cut them out.

Before I hand cut the snowflakes out I sealed the paper with Triple-Thick Crystal Clear by Krylon.
I didn't want the ink to run when I used Mod Podge to adhere them to the pot.

Next I applied Mod Podge to adhere the snowflakes to the pot.

After I applied Mod Podge the snowflakes to the pot and they dried I sealed the entire pots with
Triple-Thick Crystal Clear by Krylon. This gave it a nice shine and protects the paper image.
I glittered the rim of the pot with Martha Stewart very fine glitter. Some of the pots I glittered with Martha Stewart Tinsel glitter for a different look.

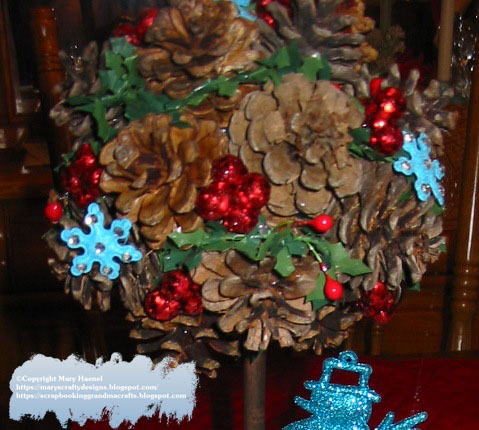
Next I purchased a 6 pack of 3"styrofoam balls.
I chose my pine cone by selecting the ones that were the same size.
Then I glued them onto the styrofoam balls with hot glue.

Next I weaved some holly ribbon through out the pine cone ball
I found a Walmart.
 I found the berries at Walmart also and cut apart the bouquet for the berries on the topiary.
I inked a dowel rod with brown in for the stem of the Topiary.
I pushed it into the styrofoam ball and secured it with hot glue.
I put styrofoam in the Pots and stuck the dowel into the pots and secured it also with hot glue.


Monday, July 11, 2011

Christmas Layout


Christmas Layout

A layout I made of my Granddaughter's 1st Christmas.

Supplies:

 K&Company - Tidings of Comfort and Joy Stack
 Snowangel cartridge. All cuts were cut at 2.5"